The hum of the dryer, the comforting warmth of freshly dried clothes – it's a familiar laundry day routine. But what happens when that comforting hum is replaced by an unsettling silence? A blown fuse could be the culprit, leaving your clothes damp and your laundry day blues amplified. Fear not, fellow laundry warriors! Replacing a dryer fuse is easier than you might think. This guide will equip you with the knowledge and confidence to tackle this DIY project and get your dryer back in action.
Before You Begin: Safety First!
Always unplug your dryer from the power outlet before attempting any repairs. Take note of your model number, as different models may have varying fuse locations and replacement procedures. Consult your dryer's user manual for specific instructions and safety precautions.
Identifying the Culprit: Signs of a Blown Fuse
Several symptoms can point towards a blown dryer fuse:
Tools for the Trade:
Step-by-Step Guide to Dryer Fuse Replacement:
Unplug and open: As mentioned earlier, ensure your dryer is unplugged. Locate the access panel, typically on the back or bottom of the dryer. Consult your manual for specific instructions on removal.
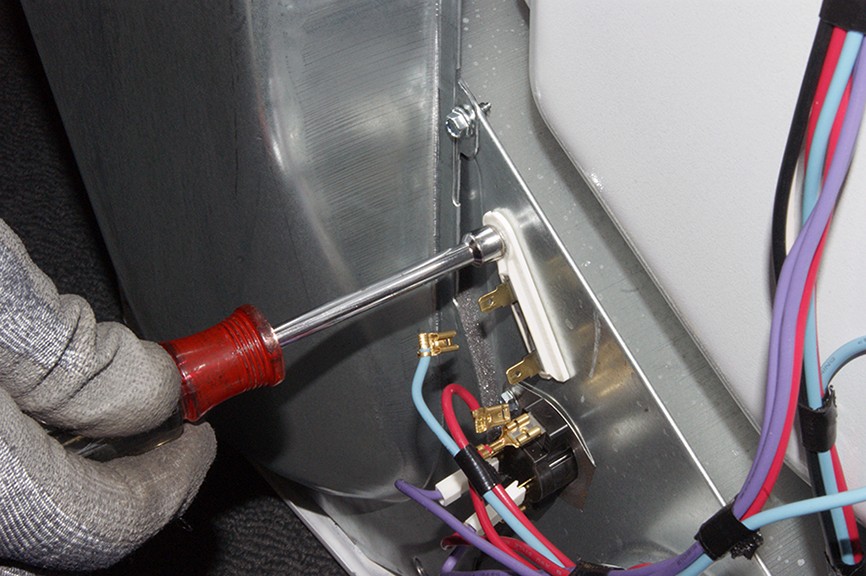
Locate the fuse: The thermal fuse is usually located near the heating element or blower housing. It's a small, cylindrical component with two terminals. Refer to your manual or online resources for exact placement specific to your model.
Disconnect the wires: Use the pliers (if needed) to carefully remove the wires from the fuse terminals. Remember their positions or take a picture for reference during reassembly.
Remove the old fuse: Unscrew or unclip the fuse from its mounting bracket. Discard the old fuse responsibly.
Install the new fuse: Insert the new fuse into the bracket, ensuring correct placement and matching the original orientation. Secure it with the screw or clip.
Reconnect the wires: Double-check your reference photo or manual to reconnect the wires to the correct terminals on the new fuse. Ensure secure connections.
Reassemble and test: Replace the access panel, ensuring proper alignment and secure closure. Plug your dryer back in and run a test cycle to confirm successful repair.
Additional Tips and Considerations:
With this guide and a little determination, you can conquer a blown dryer fuse and restore warmth and efficiency to your laundry routine. Remember, even small DIY victories can bring big satisfaction. Happy drying!
Bonus: This blog can be further enriched by including:
By incorporating these elements, you can create a comprehensive and informative resource for anyone facing a dryer fuse dilemma.
Comments (10)
I was blown away by the level of professionalism and expertise displayed by their team during my recent washer dryer repair service. Not only did they fix the issue quickly and efficiently, but they also provided helpful tips for maintaining my appliances in the future. I'm incredibly impressed and grateful for their excellent service!
Their washer dryer repair service is hands down the best in town. Not only were their technicians prompt and professional, but they also went above and beyond to ensure that my appliances were working perfectly. I'm incredibly impressed with the quality of their work and would highly recommend them to anyone in need of appliance repair.
I recently used their washer dryer repair service, and I couldn't be happier with the results. Their technicians were prompt, efficient, and incredibly skilled, and they had my appliances back up and running in no time. Their attention to detail and commitment to customer satisfaction are truly commendable. I highly recommend their services!
I was thoroughly impressed by the professionalism and expertise displayed by their team during my recent washer dryer repair service. From the moment I contacted them, their customer service was outstanding, and their technicians were incredibly knowledgeable and efficient. I'm extremely satisfied with the quality of their work and would gladly recommend them to others.
Their washer dryer repair service is hands down the best in town. Not only were their technicians prompt and professional, but they also went above and beyond to ensure that my appliances were working perfectly. I'm incredibly impressed with the quality of their work and would highly recommend them to anyone in need of appliance repair.
I recently had the pleasure of using their washer dryer repair service, and I must say, I'm thoroughly impressed. From the moment I contacted them, their customer service was exceptional, and their technicians were knowledgeable and efficient in diagnosing and fixing the issue. I highly recommend their services to anyone in need of washer dryer repair!
Kudos to Bit Appliance Repair for their prompt and reliable washer dryer repair. They're definitely my go-to!
I recently used their washer dryer repair service, and I couldn't be happier with the results. Their technicians were prompt, courteous, and incredibly skilled, and they had my appliances back up and running in no time. Their attention to detail and commitment to customer satisfaction are truly commendable. I highly recommend their services!
Their washer dryer repair service exceeded all my expectations. Their technicians were professional, courteous, and knowledgeable, and they went above and beyond to ensure that my appliances were working perfectly. I'm incredibly impressed with their level of expertise and would definitely use their services again in the future.
Highly satisfied with Bit Appliance Repair's same-day service. My washer dryer is running smoothly again!